前言
pilot-discovery宏观设计
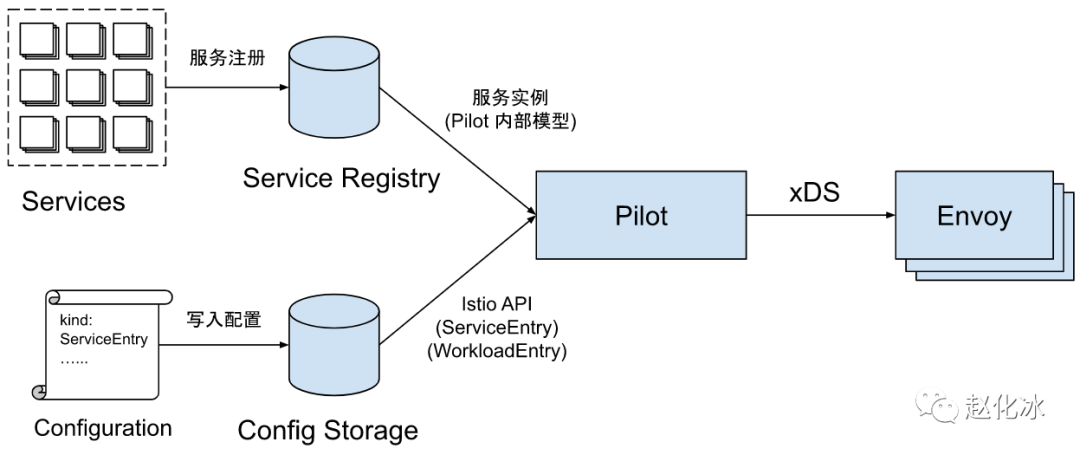
如果把Pilot看成一个处理数据的黑盒,则其有两个输入,一个输出。
-
目前Pilot的输入包括两部分数据来源:
- 服务数据(随着服务的启停、灰度等自动的): 来源于各个服务注册表(Service Registry),例如Kubernetes中注册的Service,Consul/Nacos中的服务等。
- 配置规则(人为的): 各种配置规则,包括路由规则及流量管理规则等,通过Kubernetes CRD(Custom Resources Definition)形式定义并存储在Kubernetes中。PS:本质就是一些配置,只是pilot 没有提供直接的crud API,通过k8s中转一下:人 ==> k8s ==> pilot
-
Pilot的输出为符合xDS接口的数据面配置数据,并通过gRPC Streaming接口将配置数据推送到数据面的Envoy中。
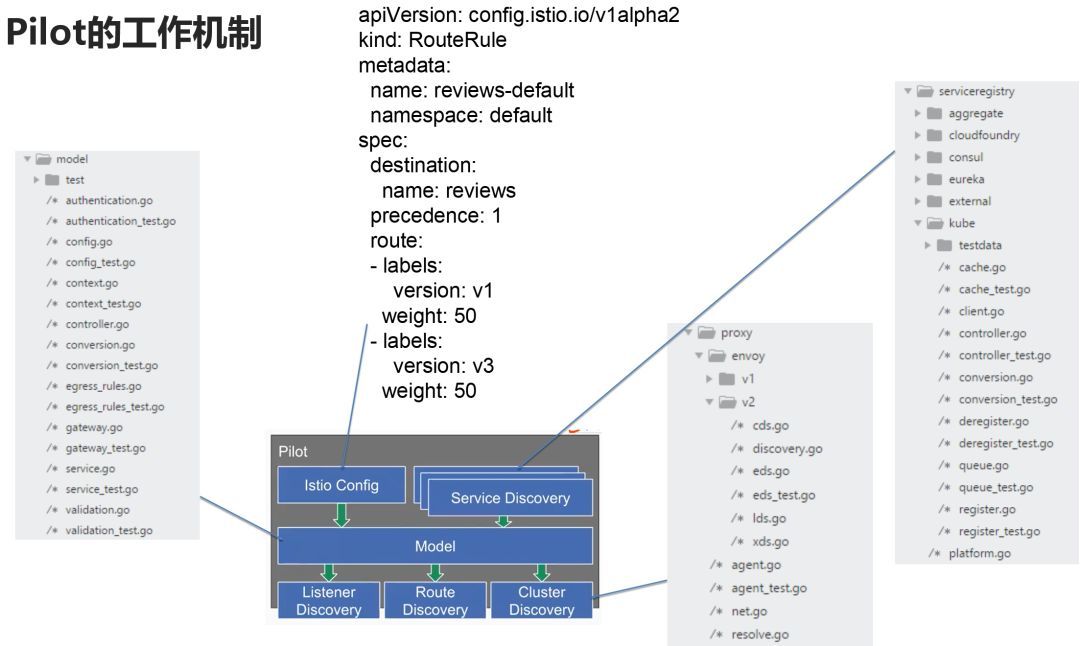
代码、配置、架构一体化视角 深入解读Service Mesh背后的技术细节
从协议视角看pilot-discovery
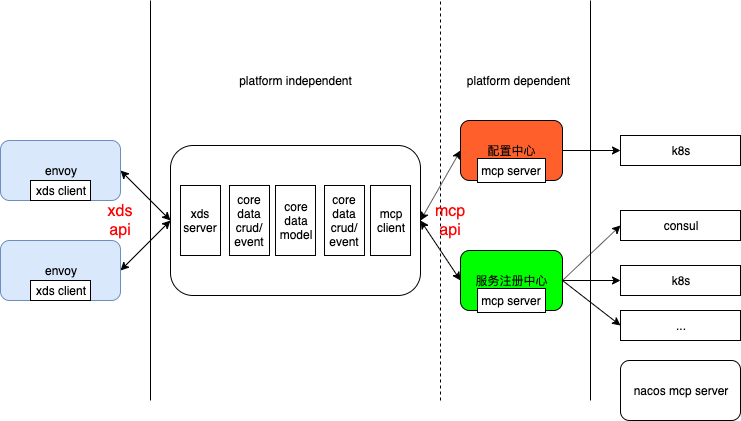
获取配置和服务数据
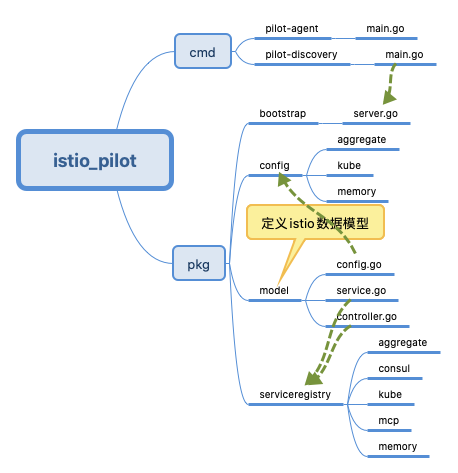
底层平台 多种多样,istio 抽象一套自己的数据模型(pilot/pkg/model)及数据存取接口,以屏蔽底层平台。
服务数据部分
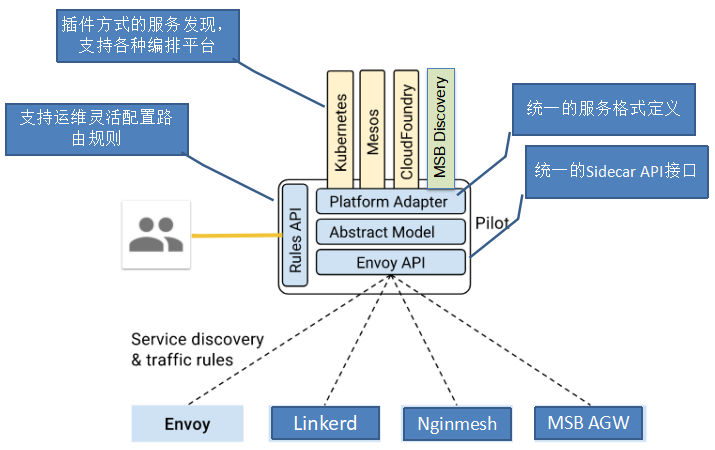
中间Abstract Model 层 实现如下
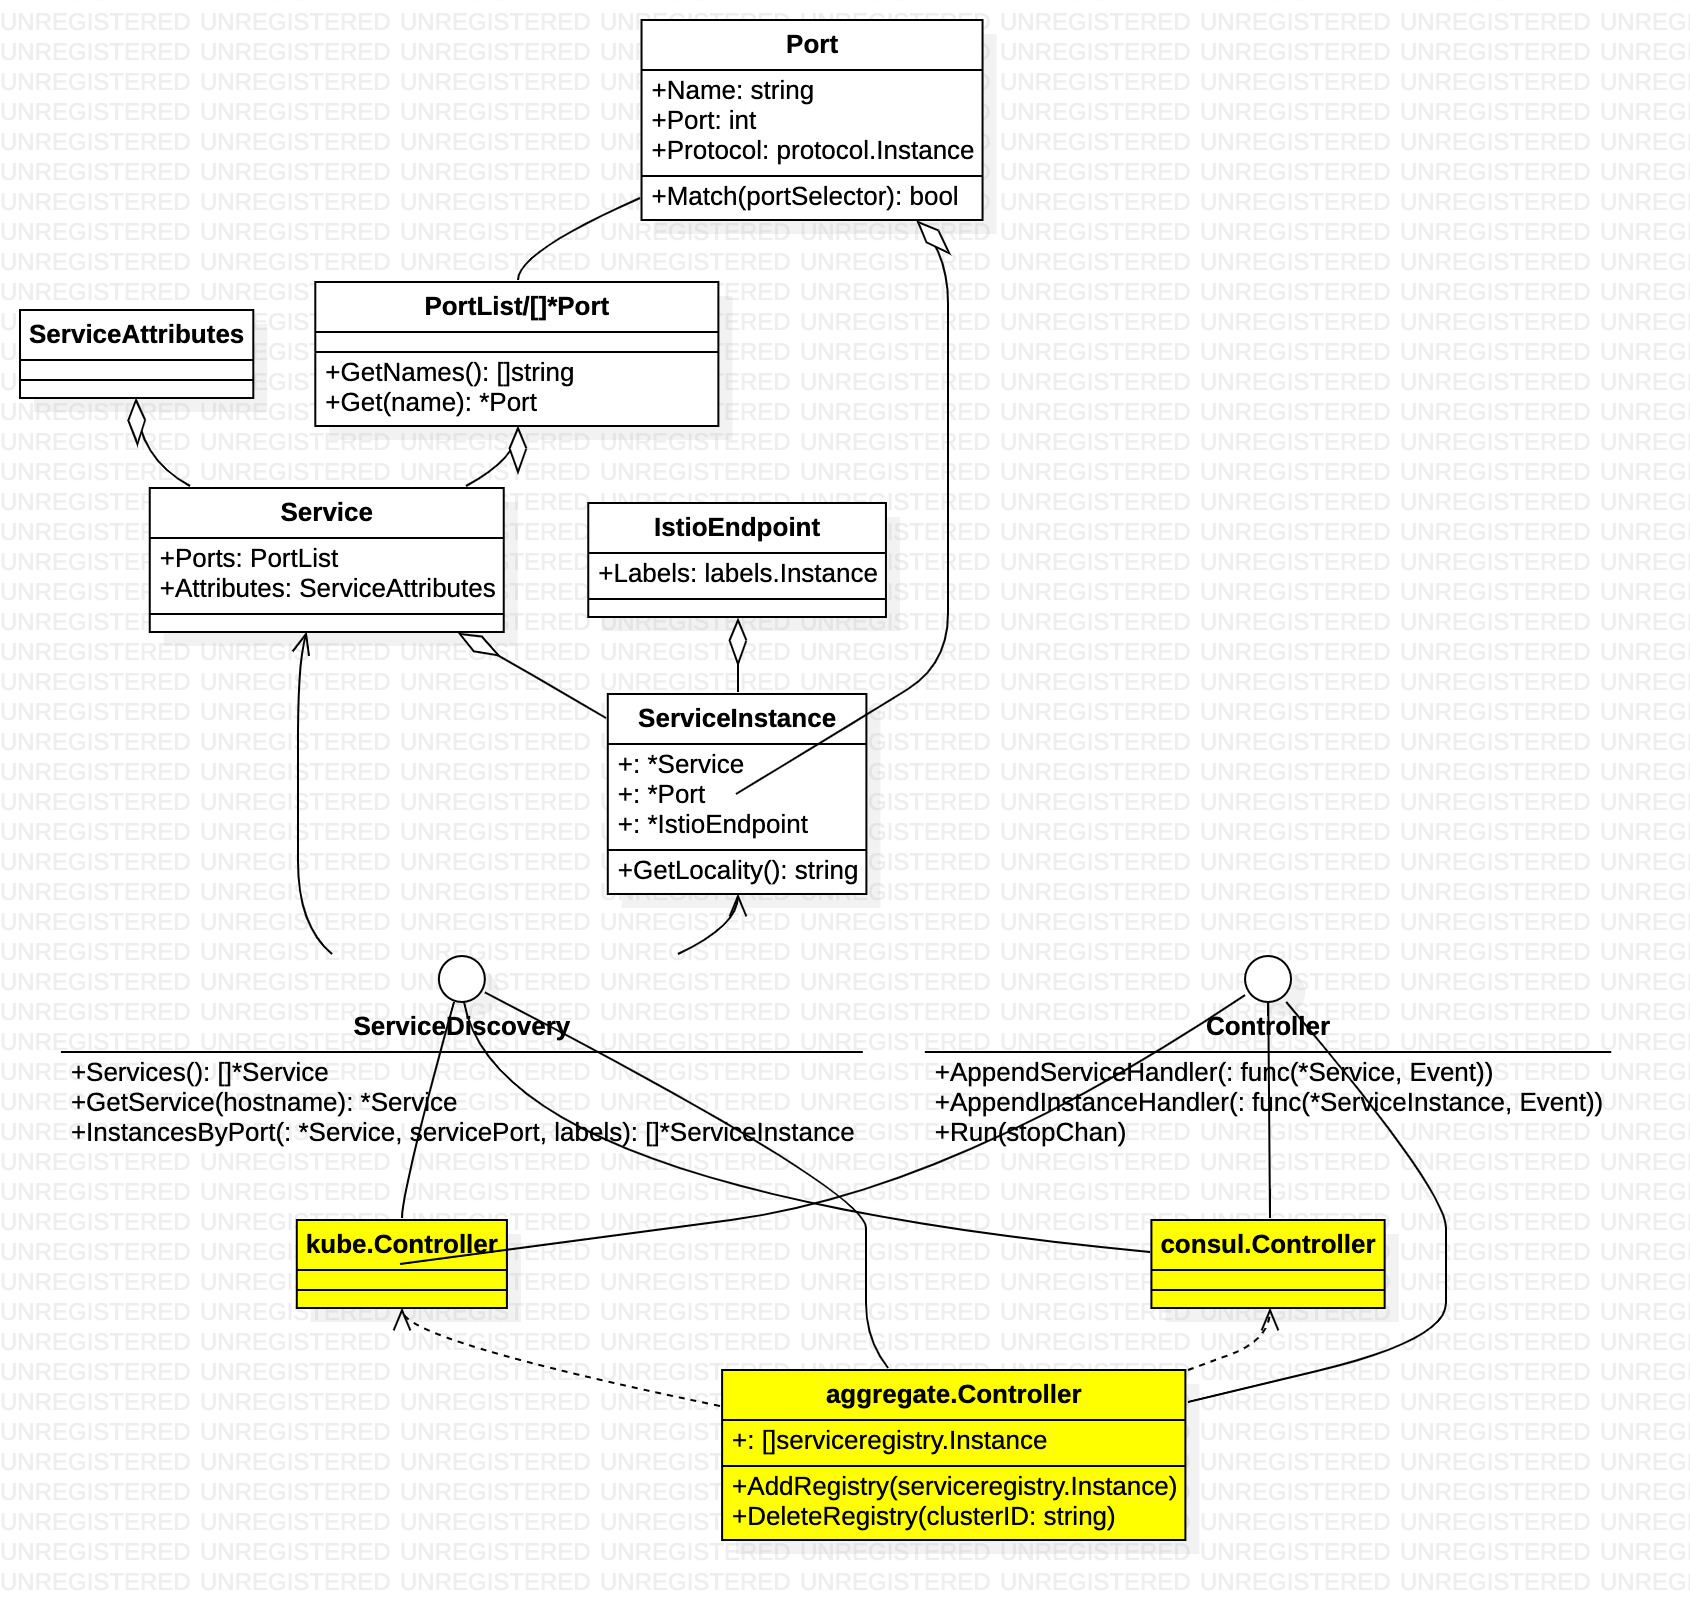
Service describes an Istio service (e.g., catalog.mystore.com:8080)Each service has a fully qualified domain name (FQDN) and one or more ports where the service is listening for connections. Service用于表示Istio服务网格中的一个服务(例如 catalog.mystore.com:8080)。每一个服务有一个全限定域名(FQDN)和一个或者多个接收客户端请求的监听端口。
SercieInstance中存放了服务实例相关的信息,一个Service可以对应到一到多个Service Instance,Istio在收到客户端请求时,会根据该Service配置的LB策略和路由规则从可用的Service Instance中选择一个来提供服务。
ServiceDiscovery抽象了一个服务发现的接口,所有接入istio 的平台应提供该接口实现。
Controller抽象了一个Service Registry变化通知的接口,该接口会将Service及Service Instance的增加,删除,变化等消息通知给ServiceHandler(也就是一个func)。调用Controller的Run方法后,Controller会一直执行,将监控Service Registry的变化,并将通知到注册到Controller中的ServiceHandler中。
由上图可知,底层平台 接入时必须实现 ServiceDiscovery 和 Controller,提供Service 数据,并在Service 变动时 执行handler。 整个流程 由Controller.Run 触发,将平台数据 同步and 转换到 istio 内部数据模型(ServiceDiscovery实现),若数据有变化,则触发handler。
配置数据部分
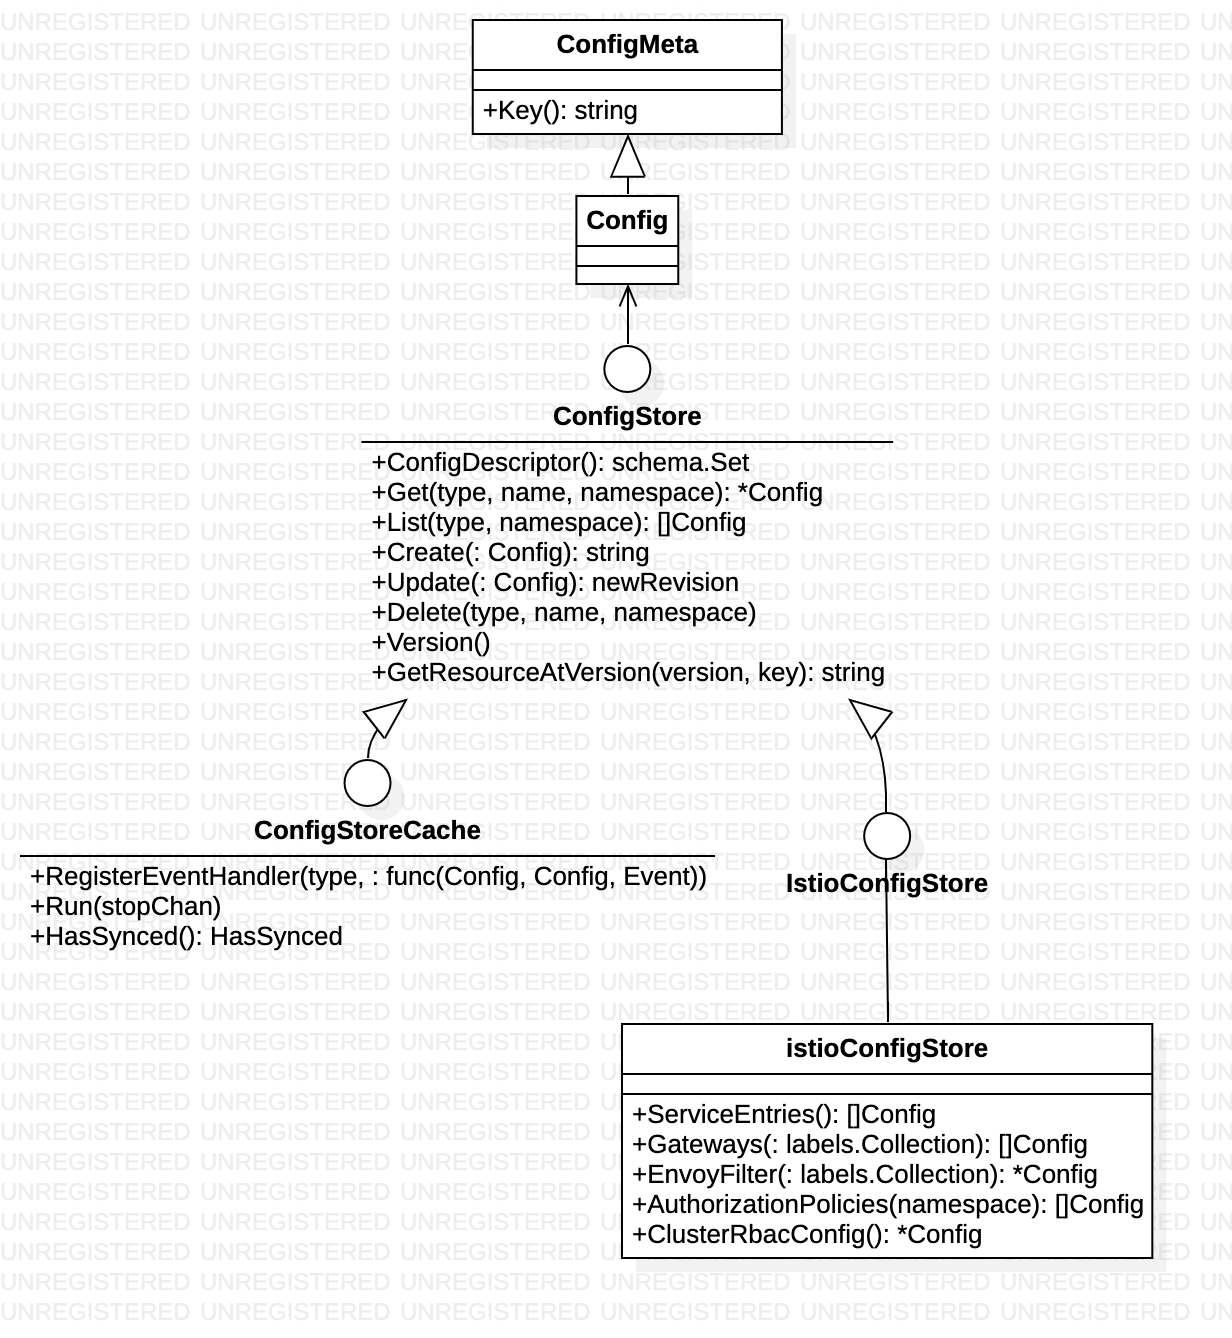
ConfigStore describes a set of platform agnostic APIs that must be supported by the underlying platform to store and retrieve Istio configuration. ConfigStore定义一组平台无关的,但是底层平台(例如K8S)必须支持的API,通过这些API可以存取Istio配置信息每个配置信息的键,由type + name + namespace的组合构成,确保每个配置具有唯一的键。写操作是异步执行的,也就是说Update后立即Get可能无法获得最新结果。
ConfigStoreCache表示ConfigStore的本地完整复制的缓存,此缓存主动和远程存储保持同步,并且在获取更新时提供提供通知机制。为了获得通知,事件处理器必须在Run之前注册,缓存需要在Run之后有一个初始的同步延迟。
IstioConfigStore扩展ConfigStore,增加一些针对Istio资源的操控接口
由上图可知,底层平台 接入时必须实现 ConfigStoreCache,提供Config 数据,并在Config 变动时 执行handler。 整个流程 由ConfigStoreCache.Run 触发,将平台数据 同步and 转换到 istio 内部数据模型(ConfigStore实现),若数据有变化,则触发handler。
Environment 聚合
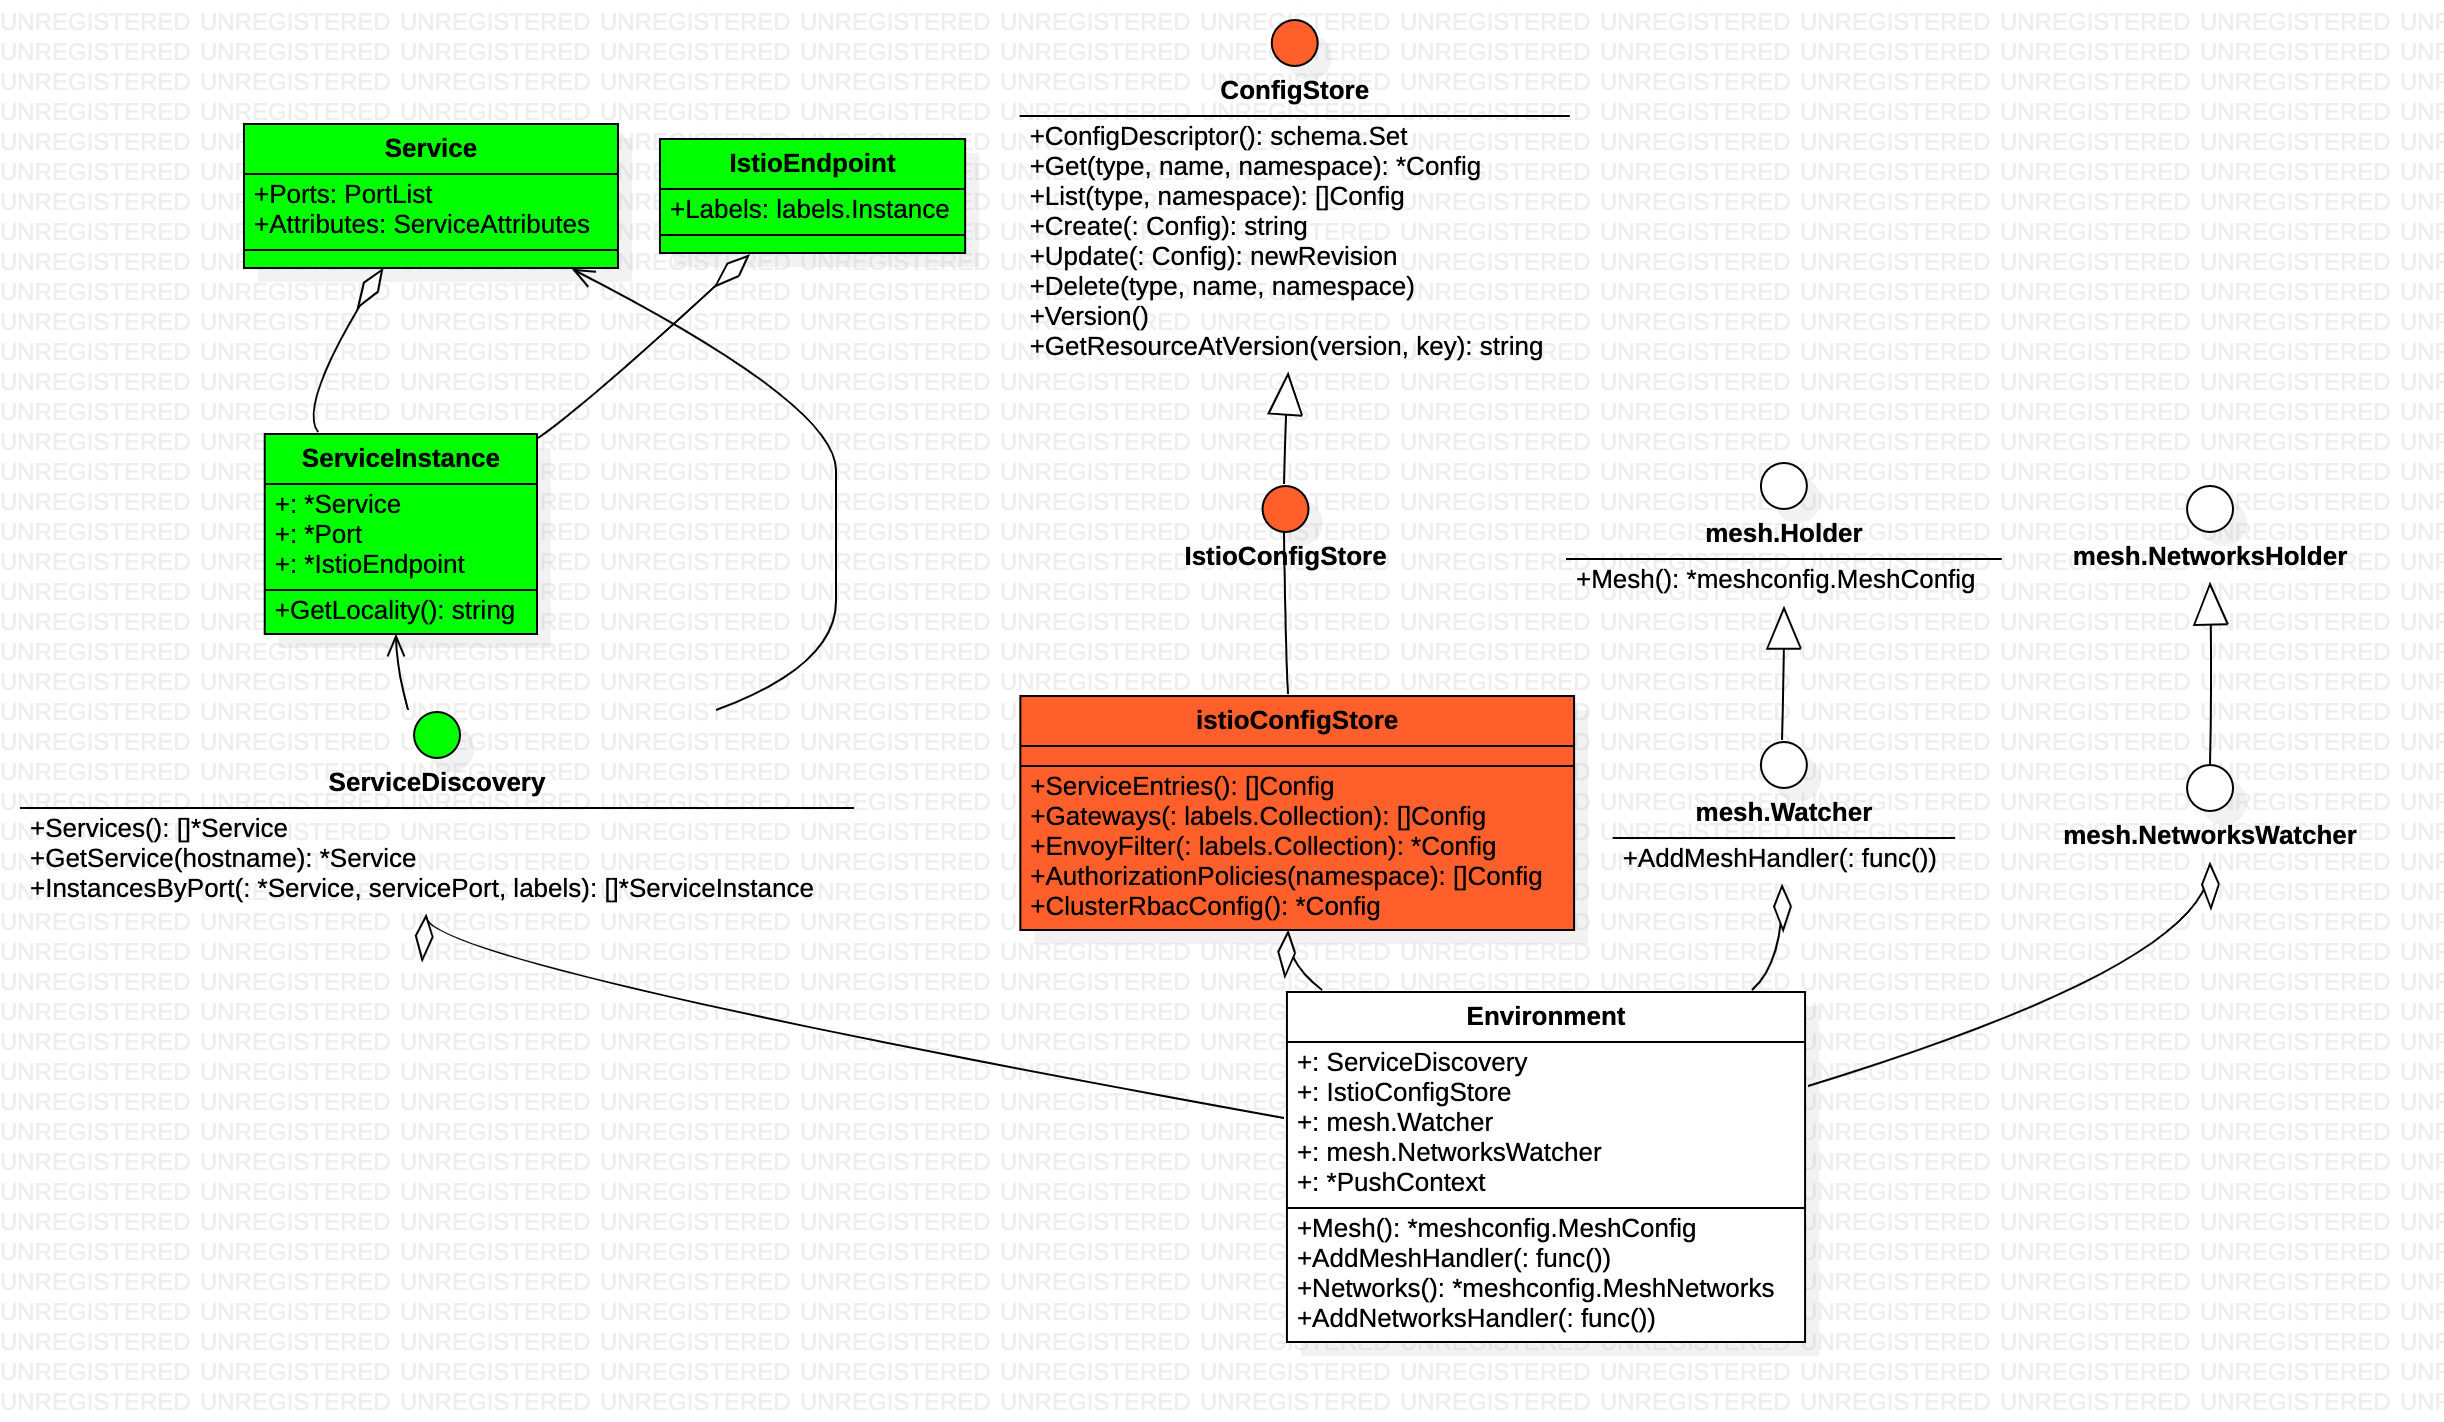
Environment provides an aggregate environmental API for Pilot. Environment为Pilot提供聚合的环境性的API
由上文可知,启动时,向 Controller 和ConfigStoreCache 注册handler,执行 ConfigStoreCache.Run 和 Controller.Run,便可以同步 service 和config 数据,并在数据变动时 触发handler 执行。pilot数据输入的部分就解决了
启动
启动命令示例:/usr/local/bin/pilot-discovery discovery --monitoringAddr=:15014 --log_output_level=default:info --domain cluster.local --secureGrpcAddr --keepaliveMaxServerConnectionAge 30m
package bootstrap
func NewServer(args *PilotArgs) (*Server, error) {
    s.initKubeClient(args)
    s.initMeshConfiguration(args, fileWatcher)
    s.initMeshNetworks(args, fileWatcher)
    s.initCertController(args)
    s.initConfigController(args)
    s.initServiceControllers(args)
    s.initDiscoveryService(args)
    s.initMonitor(args.DiscoveryOptions.MonitoringAddr)
    s.initClusterRegistries(args)
    s.initDNSListener(args)
    // Will run the sidecar injector in pilot.Only operates if /var/lib/istio/inject exists
    s.initSidecarInjector(args)
    s.initSDSCA(args)
}
启动的逻辑很多,但从config+service+grcServer 视角看 启动代码的核心如下:
func NewServer(args *PilotArgs) (*Server, error) {
    s.addStartFunc(func(stop <-chan struct{}) error {
        go s.configController.Run(stop)
        return nil
    })
    s.addStartFunc(func(stop <-chan struct{}) error {
        go serviceControllers.Run(stop)
        return nil
    })
    ## DiscoveryServer 注册config/service 事件handler
    s.initEventHandlers(){
        s.ServiceController().AppendServiceHandler(serviceHandler)
        s.ServiceController().AppendInstanceHandler(instanceHandler)
        s.configController.RegisterEventHandler(descriptor.Type, configHandler)
    }
    s.initGrpcServer(args.KeepaliveOptions)
}
处理xds请求
如果golang 里有类似 tomcat、springmvc 的组件,那源码看起来就很简单了。
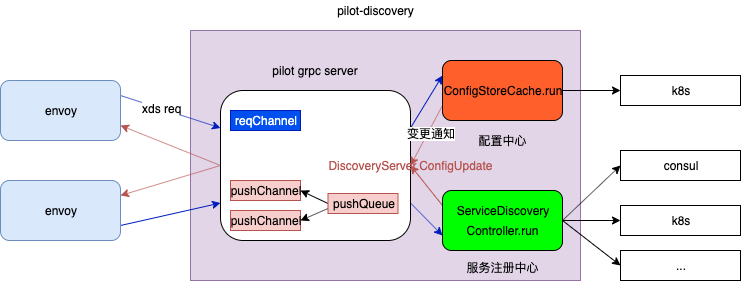
envoy 通过grpc 协议与 pilot-discovery 交互,因此首先找 ads.proto 文件
基于ads.proto 生成 ads.pb.go 文件github.com/envoyproxy/go-control-plane/envoy/service/discovery/v2/ads.pb.go 其中定义了 服务接口 AggregatedDiscoveryServiceServer,其实现类 DiscoveryServer,DiscoveryServer 方法分散于多个go 文件中
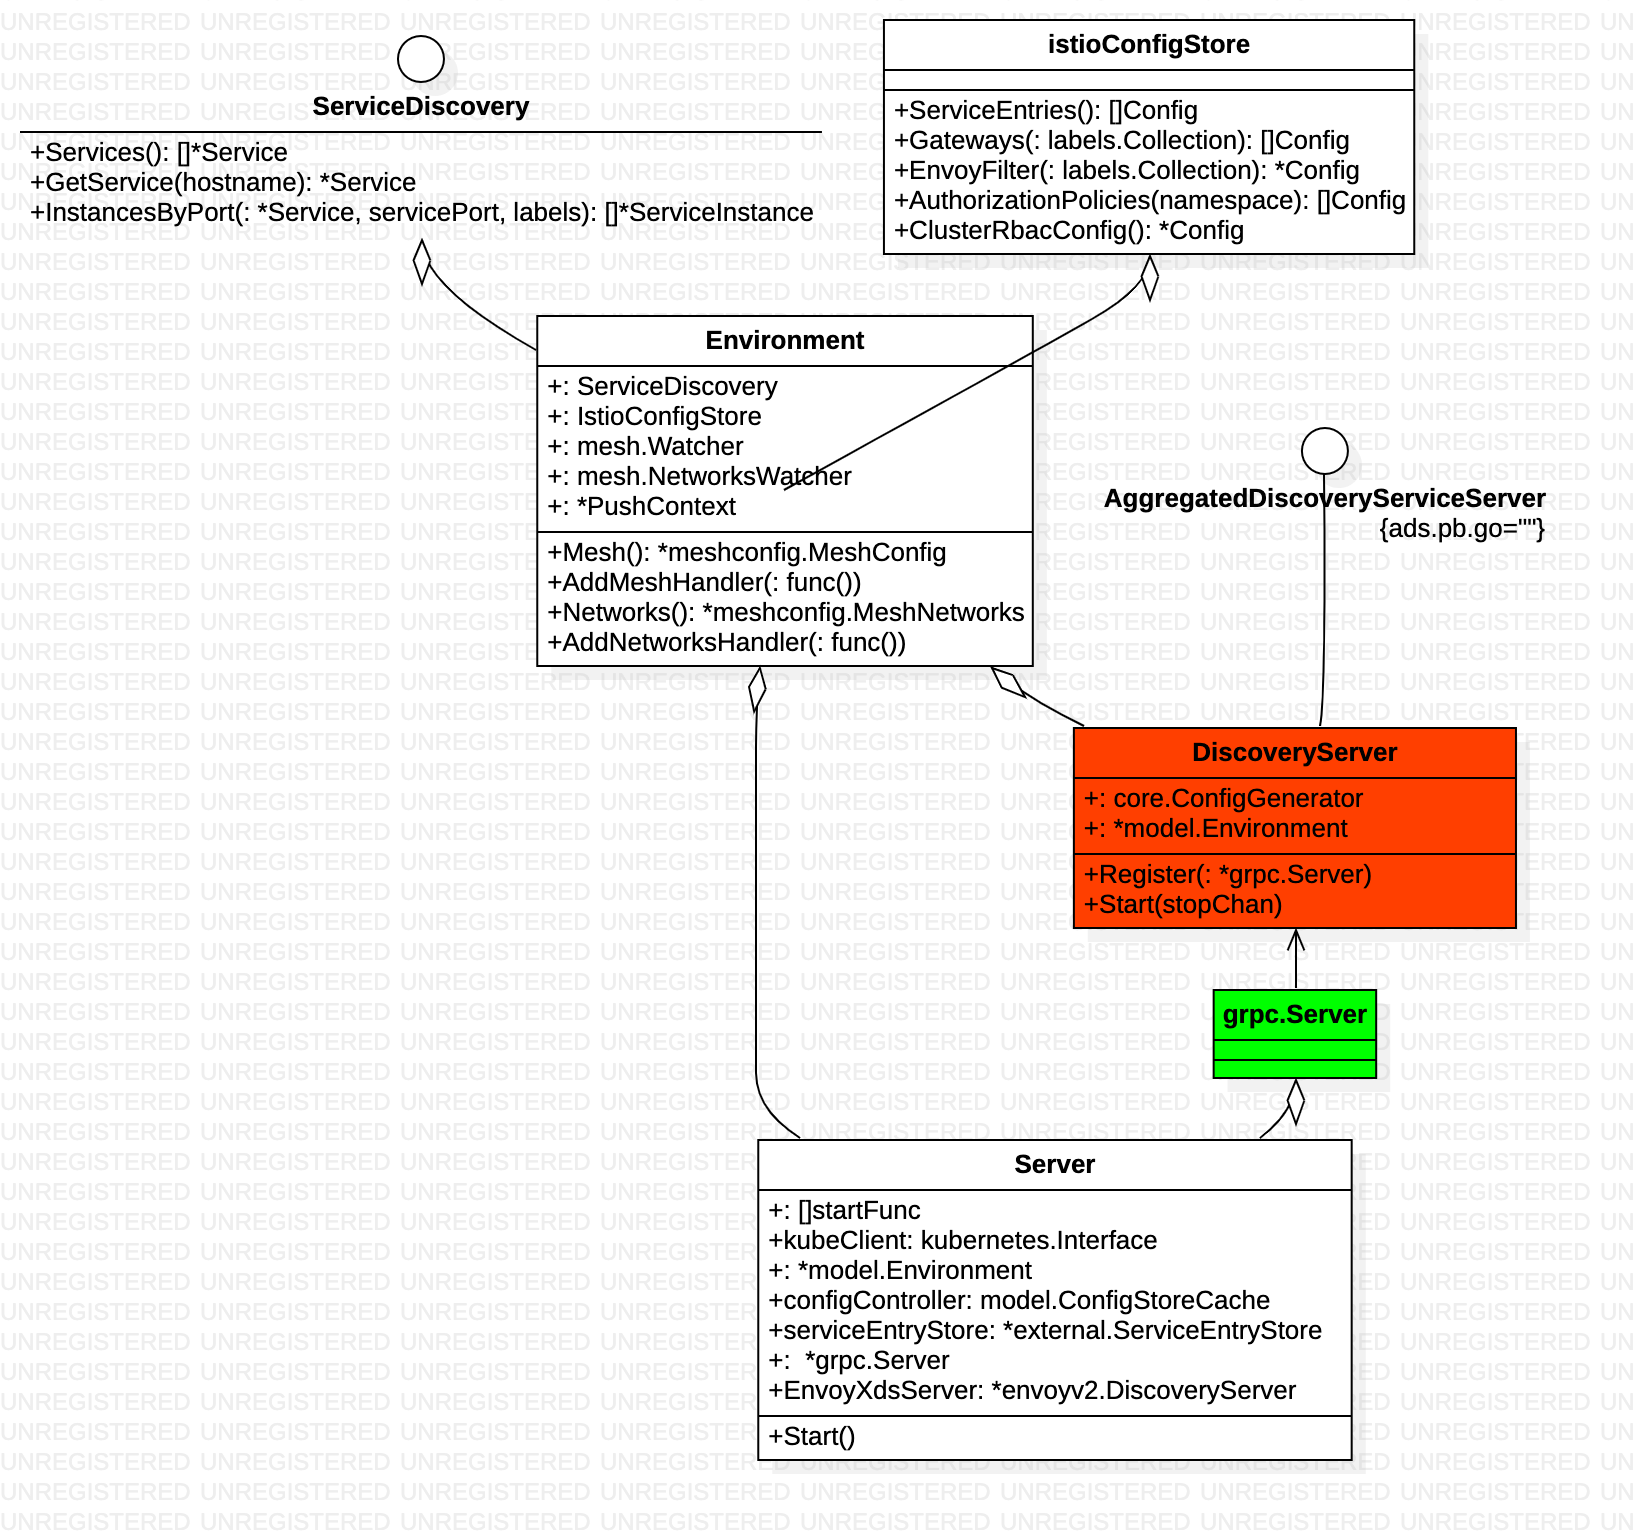
DiscoveryServer 通过Environment 间接持有了 config和 service 数据。此外, pilot-discovery Server启动时便 为DiscoveryServer 注册了config service 变更处理函数,不管config/service 如何变更,都会触发 DiscoveryServer.ConfigUpdate。
代码中 Server.EnvoyXdsServer 就是DiscoveryServer
func (s *Server) initEventHandlers() error {
    // Flush cached discovery responses whenever services configuration change.
    serviceHandler := func(svc *model.Service, _ model.Event) {
        pushReq := &model.PushRequest{...}
        s.EnvoyXdsServer.ConfigUpdate(pushReq)
    }
    s.ServiceController().AppendServiceHandler(serviceHandler)
    instanceHandler := func(si *model.ServiceInstance, _ model.Event) {
        s.EnvoyXdsServer.ConfigUpdate(&model.PushRequest{...})
    }
    s.ServiceController().AppendInstanceHandler(instanceHandler)
    if s.configController != nil {
        configHandler := func(old, curr model.Config, _ model.Event) {
            ...
            s.EnvoyXdsServer.ConfigUpdate(pushReq)
        }
        for _, descriptor := range schemas.Istio {
            s.configController.RegisterEventHandler(descriptor.Type, configHandler)
        }
    }
    return nil
}
proxy
Proxy contains information about an specific instance of a proxy (envoy sidecar, gateway,etc). The Proxy is initialized when a sidecar connects to Pilot, and populated from ‘node’ info in the protocol as well as data extracted from registries. proxy struct是sidecar 在 pilot 内的一个表示。
type Proxy struct {
    ClusterID string
    // Type specifies the node type. First part of the ID.
    Type NodeType
    IPAddresses []string
    ID string
    Locality *core.Locality
    // DNSDomain defines the DNS domain suffix for short hostnames (e.g.
    // "default.svc.cluster.local")
    DNSDomain string
    ConfigNamespace string
    // Metadata key-value pairs extending the Node identifier
    Metadata *NodeMetadata
    // the sidecarScope associated with the proxy
    SidecarScope *SidecarScope
    // The merged gateways associated with the proxy if this is a Router
    MergedGateway *MergedGateway
    // service instances associated with the proxy
    ServiceInstances []*ServiceInstance
    // labels associated with the workload
    WorkloadLabels labels.Collection
    // Istio version associated with the Proxy
    IstioVersion *IstioVersion
}
envoy 向pilot 发送请求
grpc 请求通过 StreamAggregatedResources 来处理
func (s *DiscoveryServer) StreamAggregatedResources(stream ads.AggregatedDiscoveryService_StreamAggregatedResourcesServer) error {
    peerInfo, ok := peer.FromContext(stream.Context())
    ...
    con := newXdsConnection(peerAddr, stream)
    ...
    // xds请求消息接收,接收后存放到reqChannel中
    reqChannel := make(chan *xdsapi.DiscoveryRequest, 1)
    go receiveThread(con, reqChannel, &receiveError)
    for {
        select {
        case discReq, ok := <-reqChannel:
            switch discReq.TypeUrl {
            case ClusterType:
                ...
                err := s.pushCds(con, s.globalPushContext(), versionInfo())
            case ListenerType:
                ...
            case RouteType:
                ...
            case EndpointType:
                ...
            }
        case pushEv := <-con.pushChannel:
            ...
        }
    }
}
StreamAggregatedResources 函数的for循环是无限循环流程,这里会监控两个channel 通道的消息,一个是reqChannel的新连接消息, 一个是pushChannel的配置变更消息。reqChannel 接收到新数据时,会从reqChannel 取出xds 请求消息discReq, 然后根据不同类型的xds请求,调用相应的xds下发逻辑。在v2版本的xds 协议实现中,为了保证多个xds数据下发的顺序,lds、rds、cds和eds 等所有的交互均在一个grpc 连接上完成,因此StreamAggregatedResources 接收到第一个请求时,会将连接保存起来,供后续配置变更时使用。
DiscoveryServer 收到 ClusterType 的请求要生成 cluster 数据响应
func (s *DiscoveryServer) pushCds(con *XdsConnection, push *model.PushContext, version string) error {
    rawClusters := s.generateRawClusters(con.node, push)
    ...
    response := con.clusters(rawClusters, push.Version)
    err := con.send(response)
    ...
    return nil
}
cluster 数据实际由ConfigGenerator 生成
func (s *DiscoveryServer) generateRawClusters(node *model.Proxy, push *model.PushContext) []*xdsapi.Cluster {
    rawClusters := s.ConfigGenerator.BuildClusters(node, push)
    ...
    return rawClusters
}
数据来自PushContext.Services 方法
func (configgen *ConfigGeneratorImpl) buildOutboundClusters(proxy *model.Proxy, push *model.PushContext) []*apiv2.Cluster {
    clusters := make([]*apiv2.Cluster, 0)
    networkView := model.GetNetworkView(proxy)
    for _, service := range push.Services(proxy) {
        ...
    }
    return clusters
}
cluster 数据来自 PushContext的privateServicesByNamespace 和 publicServices, 通过代码可以发现,它们都是初始化时从model.Environment 取Service 数据的。
func (ps *PushContext) Services(proxy *Proxy) []*Service {
    ...
    out := make([]*Service, 0)
    if proxy == nil {
        for _, privateServices := range ps.privateServicesByNamespace {
            out = append(out, privateServices...)
        }
    } else {
        out = append(out, ps.privateServicesByNamespace[proxy.ConfigNamespace]...)
    }
    out = append(out, ps.publicServices...)
    return out
}
pilot 监控到配合变化 将数据推给envoy
istio 收到变更事件并没有立即处理,而是创建一个定时器事件,通过定时器事件延迟一段时间。这样做的初衷:
- 减少配置变更的下发频率(会对多次变更进行合并),进而减少pilot 和 envoy 的通信开销(毕竟是广播,每一个envoy 都要发)
- 延迟对配置变更消息的处理, 可以保证配置下发时变更的完整性
config 或 service 数据变更触发 DiscoveryServer.ConfigUpdate 发送请求到 pushChannel
func (s *DiscoveryServer) ConfigUpdate(req *model.PushRequest) {
    inboundConfigUpdates.Increment()
    s.pushChannel <- req
}
DiscoveryServer 启动时 触发了handleUpdates 负责DiscoveryServer.pushChannel 的消费
func (s *DiscoveryServer) Start(stopCh <-chan struct{}) {
    go s.handleUpdates(stopCh)
    go s.periodicRefreshMetrics(stopCh)
    go s.sendPushes(stopCh)
}
handleUpdates 触发 debounce(防抖动)
// 第一个参数ch实际是 pushChannel
func debounce(ch chan *model.PushRequest, stopCh <-chan struct{}, pushFn func(req *model.PushRequest)) {
    var req *model.PushRequest
    pushWorker := func() {
        ...
        // 符合一定条件 执行 pushFn
        go push(req)
        ...
    }
    for {
        select {
        case <-freeCh:
            ...
        case r := <-ch:
            ...
            req = req.Merge(r)
        case <-timeChan:
            if free {
                pushWorker()
            }
        case <-stopCh:
            return
        }
    }
}
pushFn 实际是DiscoveryServer.Push ==> AdsPushAll ==> startPush 将数据塞入 PushQueue中。
func (s *DiscoveryServer) Push(req *model.PushRequest) {
    if !req.Full {
        req.Push = s.globalPushContext()
        go s.AdsPushAll(versionInfo(), req)
        return
    }
    ...
    req.Push = push
    go s.AdsPushAll(versionLocal, req)
}
DiscoveryServer 启动时 触发sendPushes ,负责消费PushQueue ==> doSendPushes 最终发给每一个envoy/conneciton 的pushChannel ,envoy/conneciton 的pushChannel 的消费逻辑在DiscoveryServer.StreamAggregatedResources的for 循环中
func (s *DiscoveryServer) StreamAggregatedResources(stream ads.AggregatedDiscoveryService_StreamAggregatedResourcesServer) error {
    ...
    for {
        select {
        case discReq, ok := <-reqChannel:
            ...
        case pushEv := <-con.pushChannel:
            err := s.pushConnection(con, pushEv)
		    pushEv.done()
		    if err != nil {
			    return nil
		    }
        }
    }
}
pilot-agent
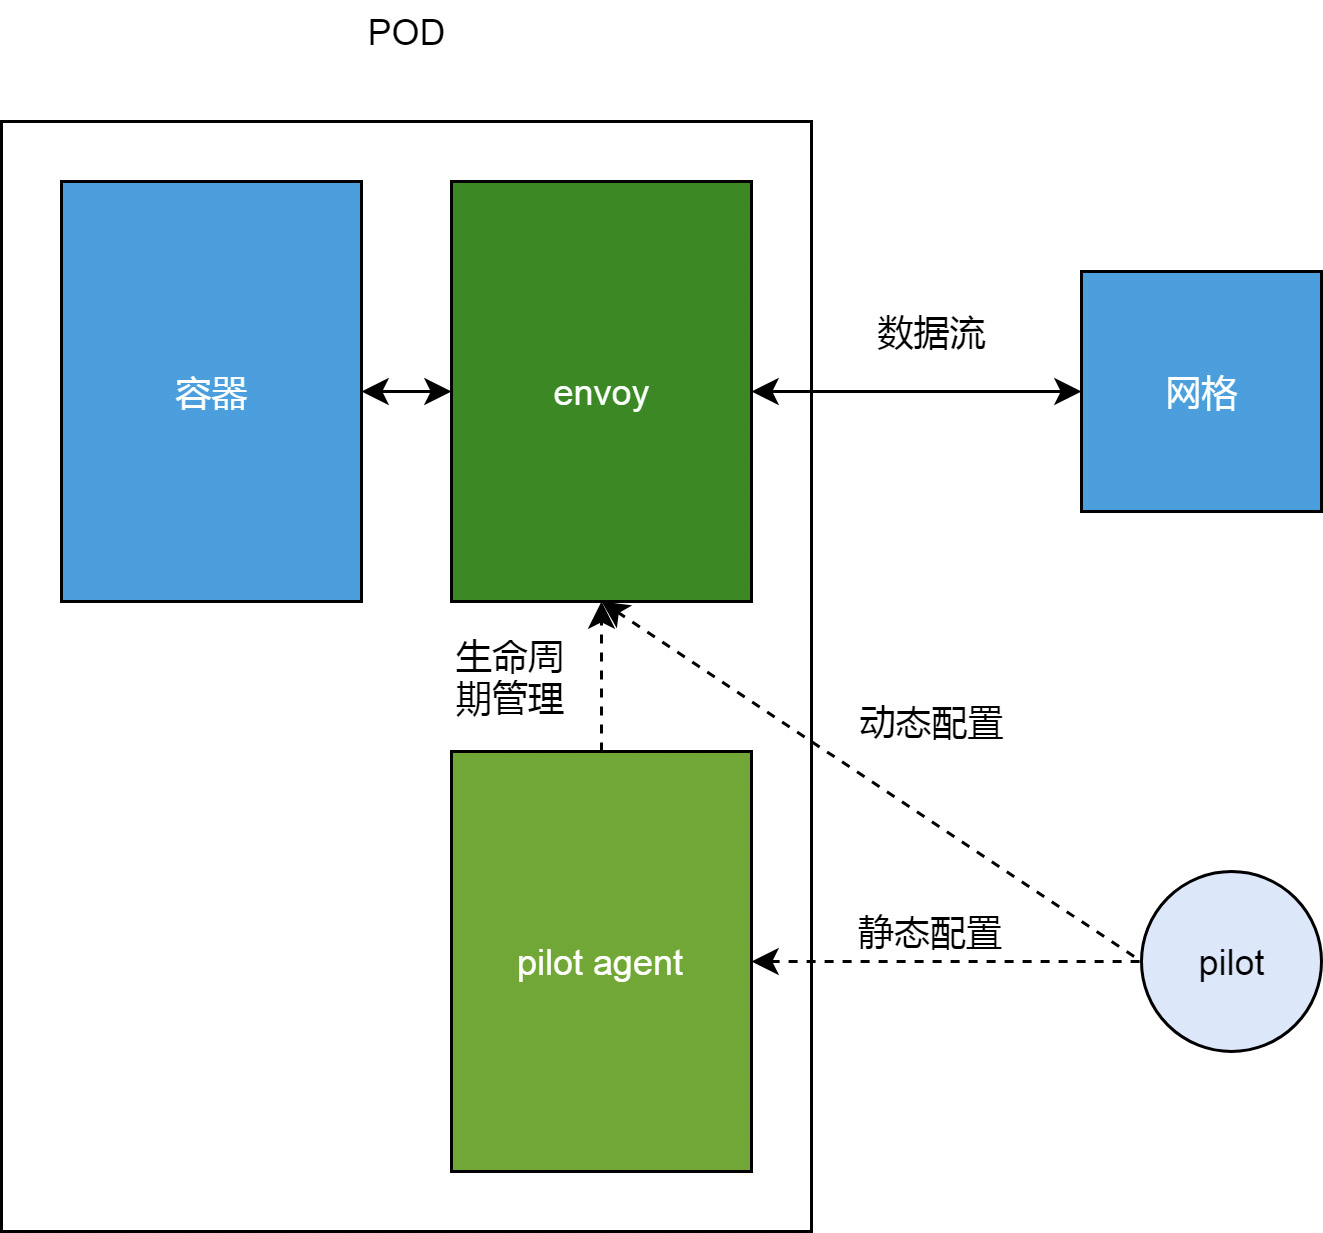
- 所谓sidecar 容器, 不是直接基于envoy 制作镜像,容器启动后,entrypoint 也是envoy 命令
- sidecar 容器的entrypoint 是
/usr/local/bin/pilot-agent proxy,首先生成 一个envoyxx.json 文件,然后 使用 exec.Command启动envoy -
进入sidecar 容器,
ps -ef一下, 是两个进程## 具体明令参数 未展示 UID PID PPID C STIME TTY TIME CMD 1337 1 0 0 May09 ? 00:00:49 /usr/local/bin/pilot-agent proxy 1337 567 1 1 09:18 ? 00:04:42 /usr/local/bin/envoy -c envoyxx.json
为什么要用pilot-agent?负责Envoy的生命周期管理(生老病死)
- 启动envoy
- 热更新envoy,poilt-agent只负责启动另一个envoy进程,其他由新旧两个envoy自行处理
- 抢救envoy
- 优雅关闭envoy
其它
