简介
- 简介
- 启动过程
- starter 依赖扩展ApplicationContext的入口 ApplicationContextInitializer
- tomcat 是如何内置的——ServletWebServerApplicationContext
- @EnableAutoConfiguration 如何工作
- 其它
几个问题(也正是springboot 做了哪些事儿?)
- springboot 如何启动一个tomcat?
- 如何自动加载配置,将依赖bean 注入到spring ioc?
- 如何自动规范依赖jar?继承 spring-boot-starter-parent
建议先阅读下 回头看Spring IOC 对IOC 和 ApplicationContext 等概念有所了解。
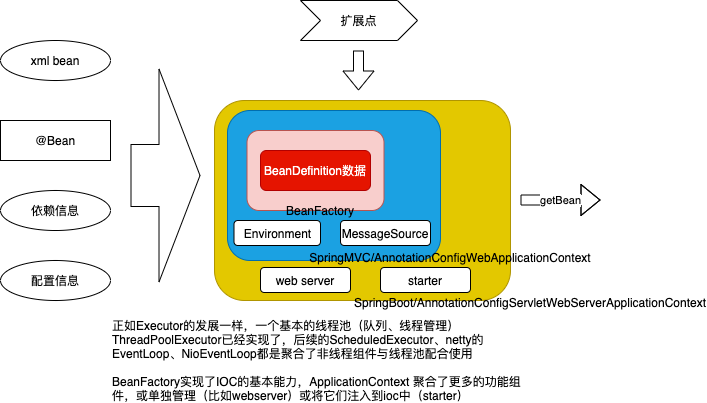
一个第三方框架想要融入spring ioc
- 只是提供操作对象,通过@Autowire 由spring 中的bean 使用。比如 rabbitmq 提供 spring-rabbit
- 通过spring 的扩展点 比如BeanPostFactory 等将 相关bean 注入到ioc
- 比如springboot,自己实现/聚合ApplicationContext ,将自己的工作融合到 ApplicationContext.refresh 中
启动过程
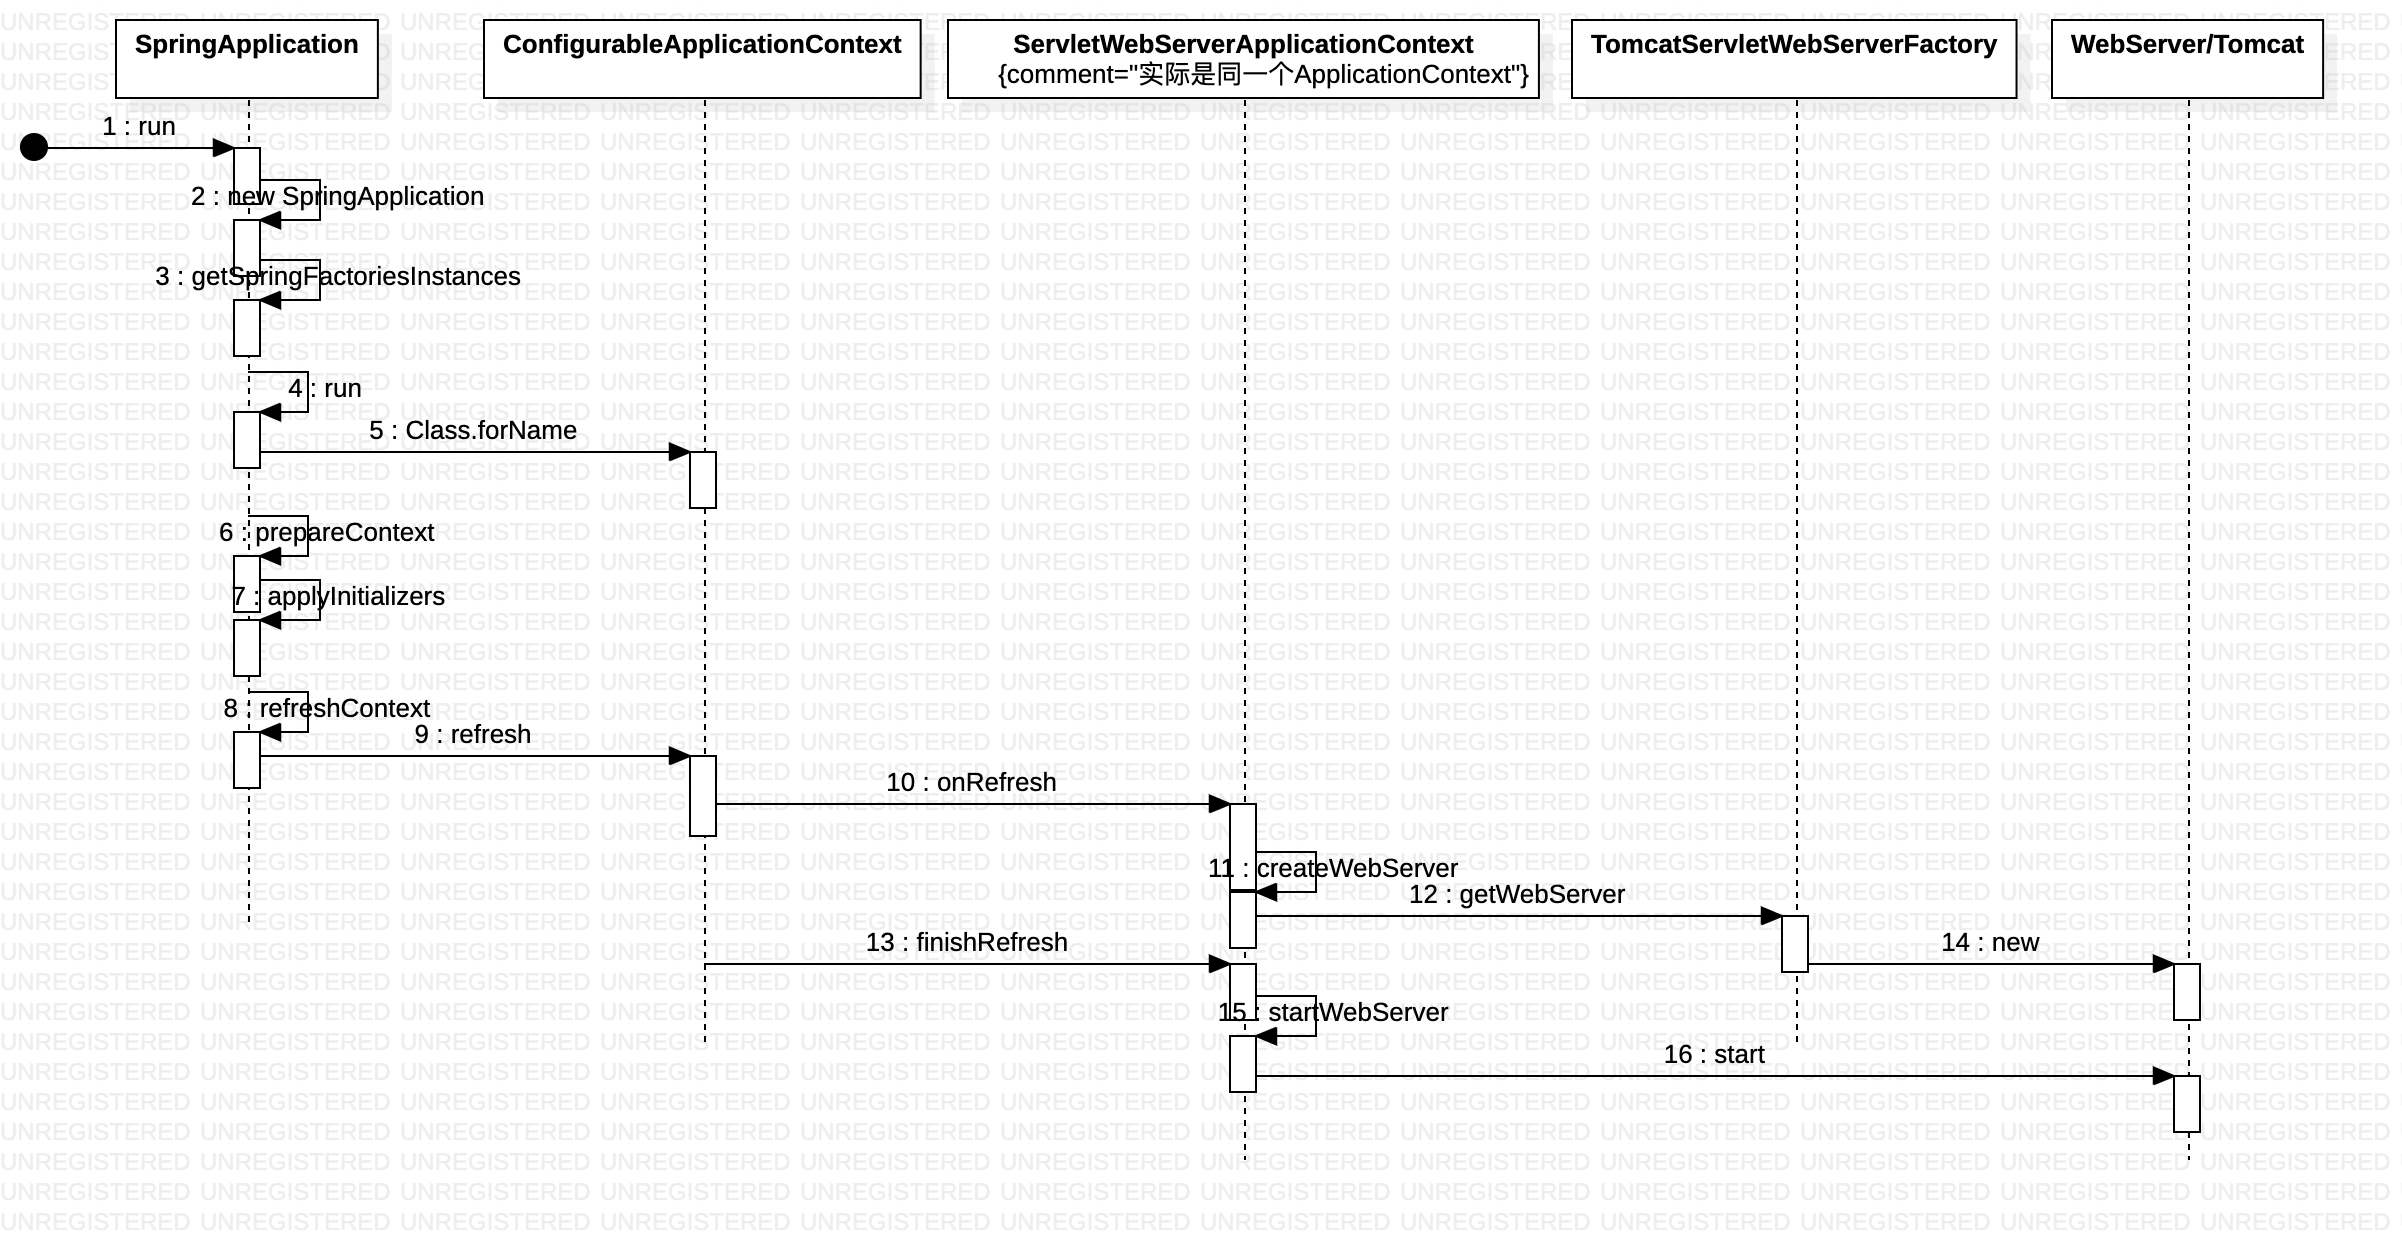
启动过程 就是AnnotationConfigServletWebServerApplicationContext的初始化过程。
@SpringBootApplication
public class SpringbootDemoApplication {
	public static void main(String[] args) {
		SpringApplication.run(DockerSpringbootDemoApplication.class, args);
	}
}
从某种视角看 SpringApplication.run 跟以下代码差不多
ApplicationContext applicationContext = new ClassPathXmlApplicationContext("application.xml");
applicationContext.getBean("xx")
public class SpringApplication {
    private List<ApplicationContextInitializer<?>> initializers;
    private List<ApplicationListener<?>> listeners;
    public SpringApplication(ResourceLoader resourceLoader, Class<?>... primarySources) {
        this.resourceLoader = resourceLoader;
        Assert.notNull(primarySources, "PrimarySources must not be null");
        this.primarySources = new LinkedHashSet<>(Arrays.asList(primarySources));
        this.webApplicationType = WebApplicationType.deduceFromClasspath();
        setInitializers((Collection) getSpringFactoriesInstances(
                ApplicationContextInitializer.class));
        setListeners((Collection) getSpringFactoriesInstances(ApplicationListener.class));
        this.mainApplicationClass = deduceMainApplicationClass();
    }
    public static ConfigurableApplicationContext run(Class<?>[] primarySources,
            String[] args) {
        return new SpringApplication(primarySources).run(args);
    }
}
getSpringFactoriesInstances 会从META-INF/spring.factories读取key为org.springframework.context.ApplicationContextInitializer的value 并创建ApplicationContextInitializer 实例,ApplicationListener类似。
SpringApplication.run 创建并刷新ApplicationContext,算是开始进入正题了。
public ConfigurableApplicationContext run(String... args) {
    ConfigurableApplicationContext context = null;
    ...
    SpringApplicationRunListeners listeners = getRunListeners(args);
    listeners.starting();

    ApplicationArguments applicationArguments = new DefaultApplicationArguments(
            args);
    ConfigurableEnvironment environment = prepareEnvironment(listeners,
            applicationArguments);
    ...
    // 创建AnnotationConfigServletWebServerApplicationContext
    context = createApplicationContext();
    ...
    prepareContext(context,environment,listeners,applicationArguments,printedBanner);
    refreshContext(context);
    listeners.started(context);
    callRunners(context, applicationArguments);
    listeners.running(context);
    return context;
}
- 所谓的 SpringApplicationRunListeners 就是在SpringApplication.run 方法执行的不同阶段去执行一些操作, SpringApplicationRunListener 也可在
META-INF/spring.factories配置 - Environment代表着程序的运行环境,主要包含了两种信息,一种是profiles,用来描述哪些bean definitions 是可用的;一种是properties,用来描述系统的配置,其来源可能是配置文件、jvm属性文件、操作系统环境变量等。
- AnnotationConfigServletWebServerApplicationContext 的默认构造方法中初始化了两个成员变量,类型分别为AnnotatedBeanDefinitionReader 和 ClassPathBeanDefinitionScanner 用来加载BeanDefinition。
其中在 prepareContext 中
private void prepareConte(ConfigurableApplicationContext context,ConfigurableEnvironment environment,SpringApplicationRunListeners listeners,ApplicationArguments applicationArguments, Banner printedBanner) {
    context.setEnvironment(environment);
    postProcessApplicationContext(context);
    applyInitializers(context);
    listeners.contextPrepared(context);
    // Add boot specific singleton beans
    ConfigurableListableBeanFactory beanFactory = context.getBeanFactory();
    beanFactory.registerSingleton("springApplicationArguments", applicationArguments);
    ...
    // Load the sources
    Set<Object> sources = getAllSources();
    load(context, sources.toArray(new Object[0]));
    listeners.contextLoaded(context);
}
applyInitializers 会执行initializer.initialize(context)
starter 依赖扩展ApplicationContext的入口 ApplicationContextInitializer
public class XXApplicationContextInitializer implements ApplicationContextInitializer<ConfigurableApplicationContext{
    @Override
    public void initialize(ConfigurableApplicationContext applicationContext) {
        ...
        applicationContext.getBeanFactory().addBeanPostProcessor(xx);
        applicationContext.getBeanFactory().registerSingleton("xx", xx);
        ...
    }
}
通过BeanFactory 对象,便可以将自定义的业务对象 注入到ioc 容器中,为spring 所用。
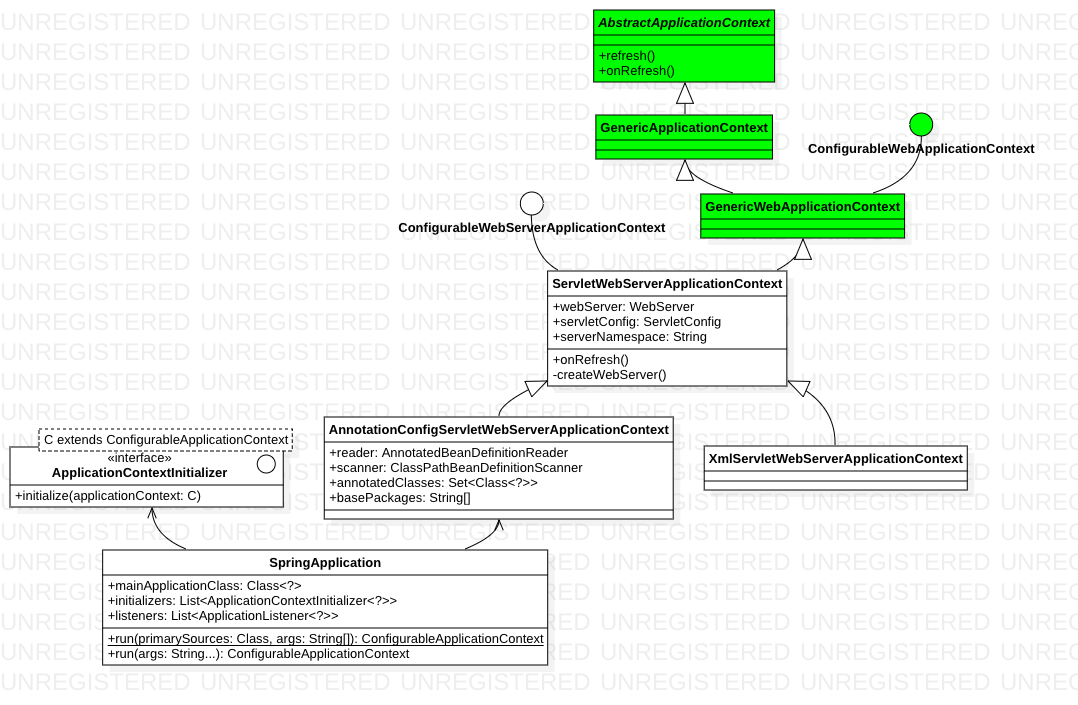
tomcat 是如何内置的——ServletWebServerApplicationContext
既然要支持多种 Web 容器,Spring Boot 对内嵌式 Web 容器进行了抽象,定义了 WebServer 接口:
public interface WebServer {
    void start() throws WebServerException;
    void stop() throws WebServerException;
    int getPort();
}
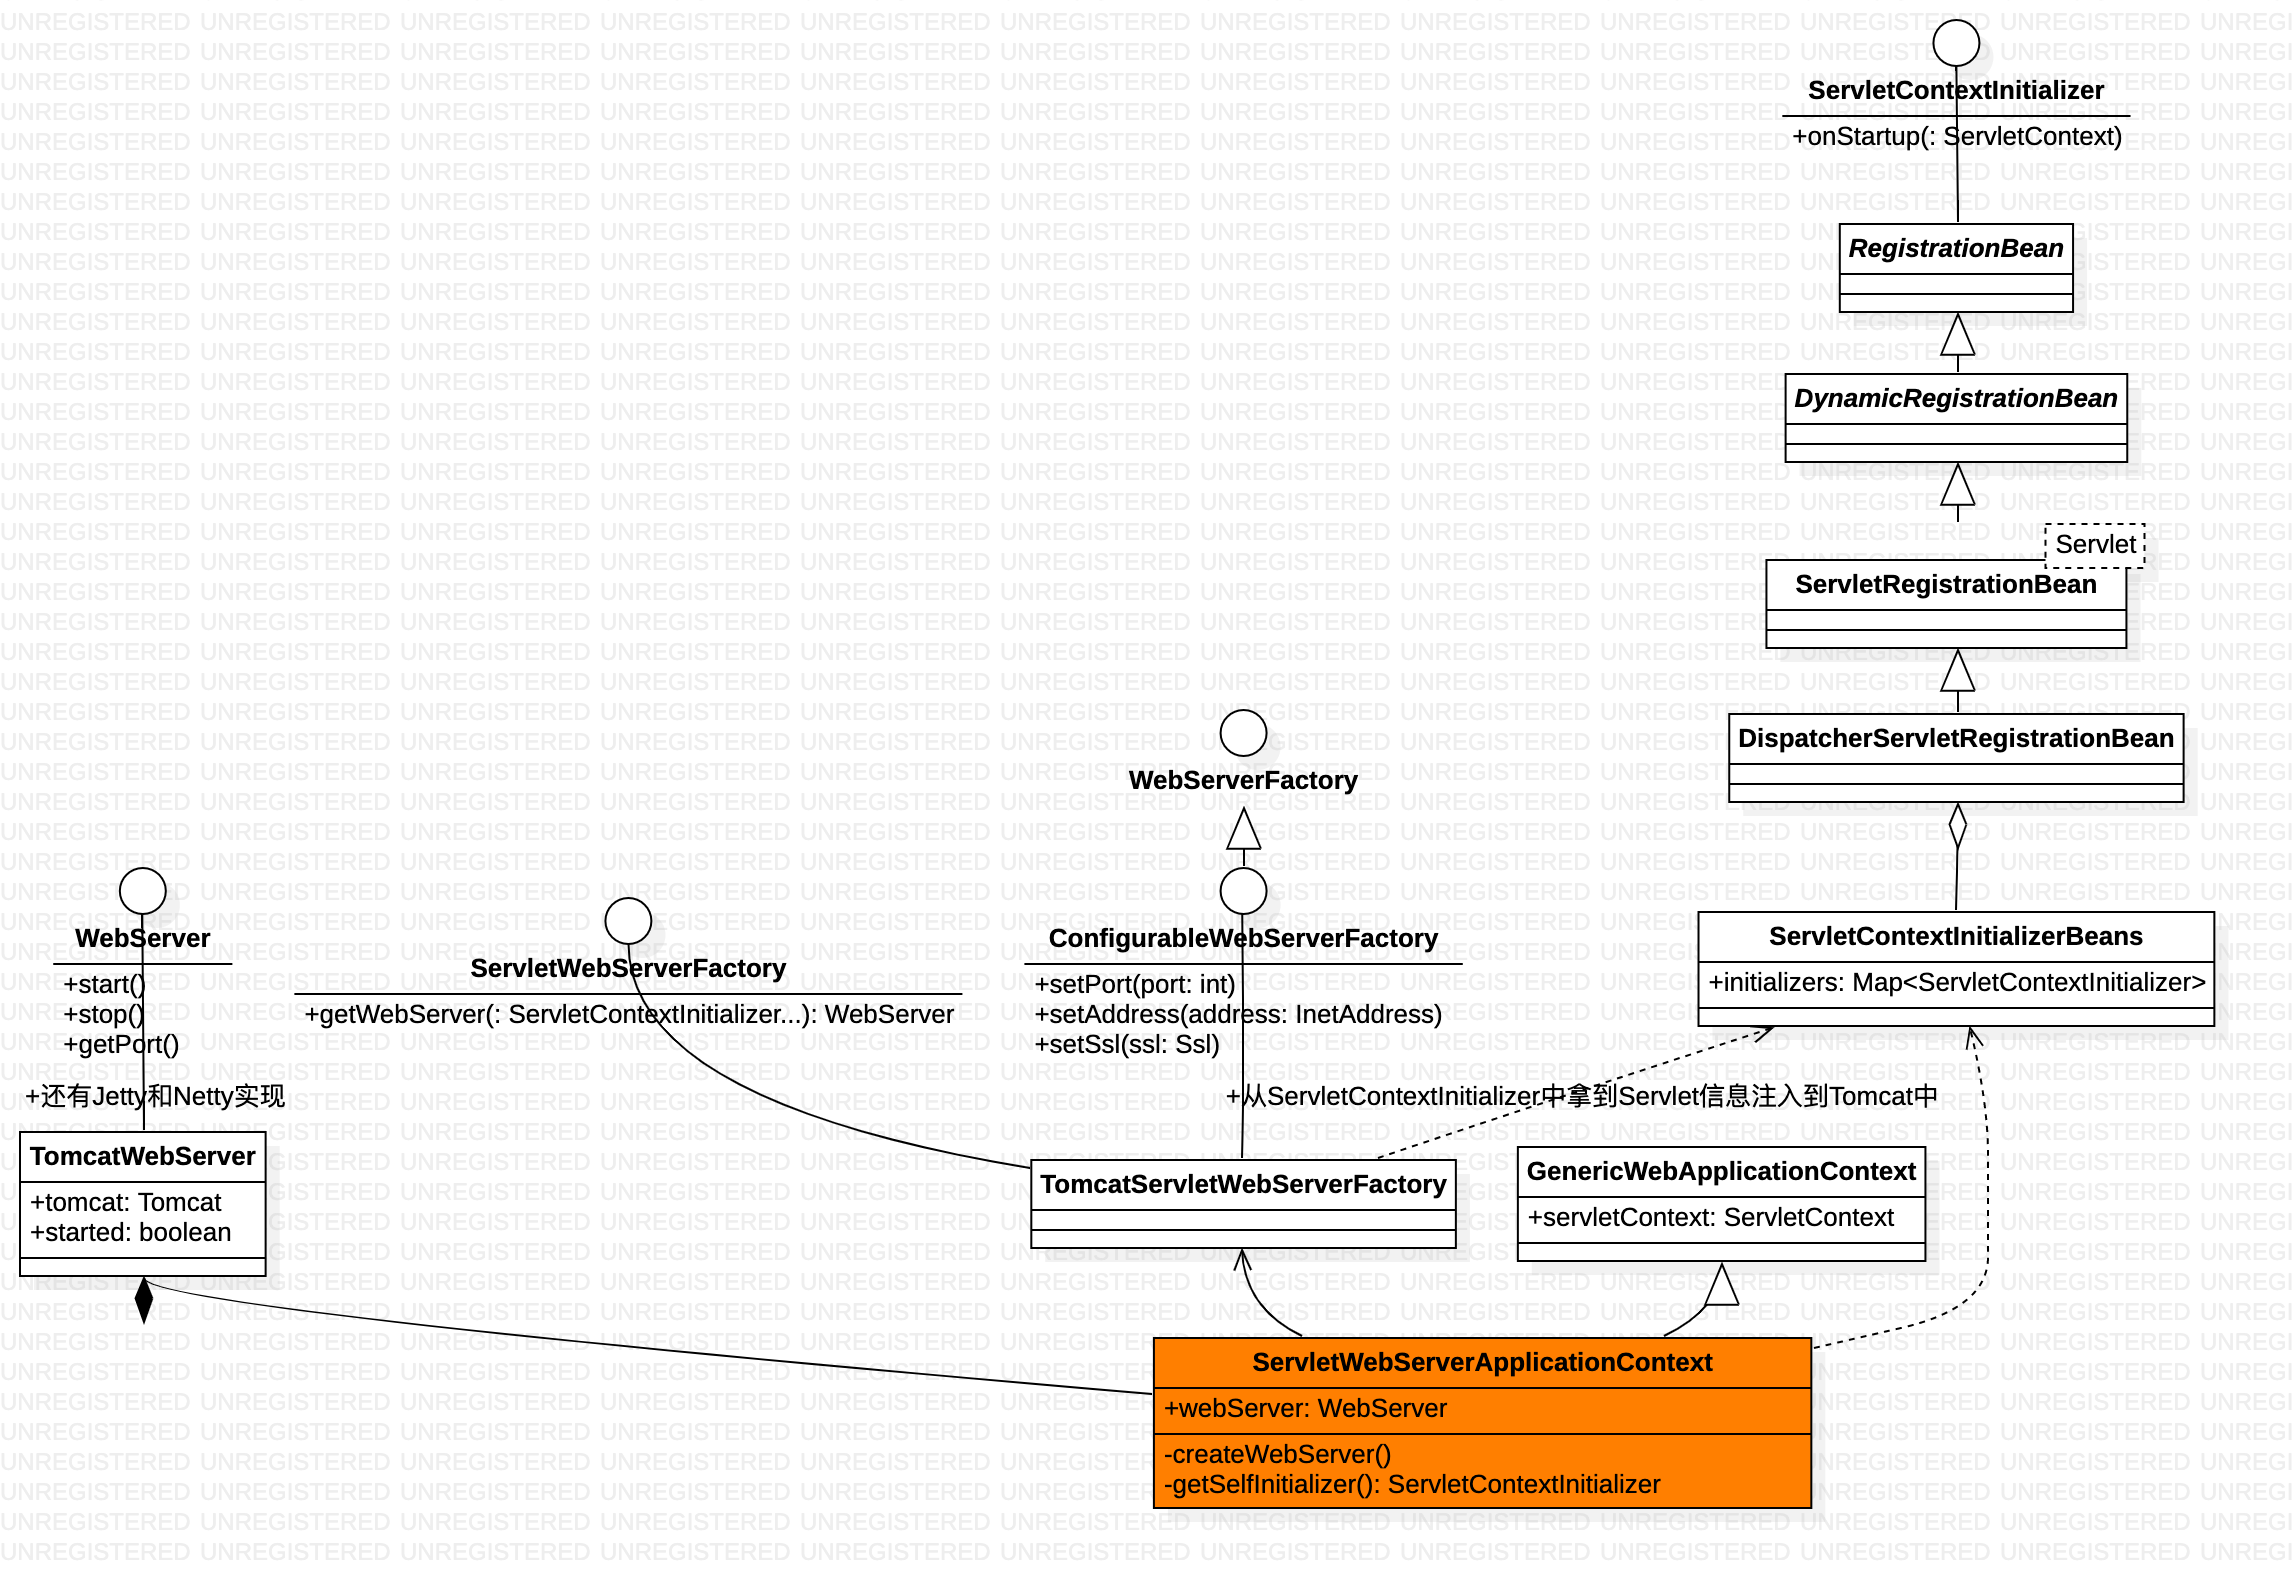
内嵌式 Web 容器的创建和启动
Spring 的核心是一个 ApplicationContext,它的抽象实现类 AbstractApplicationContext 实现了著名的 refresh 方法,它用来新建或者刷新一个 ApplicationContext,在 refresh 方法中会调用 onRefresh 方法,AbstractApplicationContext 的子类可以重写这个 onRefresh 方法,来实现特定 Context 的刷新逻辑,因此 ServletWebServerApplicationContext 就是通过重写 onRefresh 方法来创建内嵌式的 Web 容器
public class ServletWebServerApplicationContext extends GenericWebApplicationContext implements ConfigurableWebServerApplicationContext {
    private volatile WebServer webServer;
    protected void onRefresh() {
        super.onRefresh();
        try {
            this.createWebServer();
        } catch (Throwable var2) {
            throw new ApplicationContextException("Unable to start web server", var2);
        }
    }
    private void createWebServer() {...}
        protected void finishRefresh() {
        super.finishRefresh();
        WebServer webServer = this.startWebServer();
        if (webServer != null) {
            this.publishEvent(new ServletWebServerInitializedEvent(webServer, this));
        }
    }
    private WebServer startWebServer() {
        WebServer webServer = this.webServer;
        if (webServer != null) {
            webServer.start();
        }
        return webServer;
    }
}
注册 Servlet 的三种方式
-
Servlet 注解,在 Spring Boot 启动类上加上 @ServletComponentScan 注解后,使用 @WebServlet、@WebFilter、@WebListener 标记的 Servlet、Filter、Listener 就可以自动注册到 Servlet 容器中
@SpringBootApplication @ServletComponentScan public class xxxApplication{ } @WebServlet("/hello") public class HelloServlet extends HttpServlet {} -
ServletRegistrationBean,Spring Boot 也提供了 ServletRegistrationBean、FilterRegistrationBean 和 ServletListenerRegistrationBean 这三个类分别用来注册 Servlet、Filter、Listener。
@Bean public ServletRegistrationBean servletRegistrationBean() { return new ServletRegistrationBean(new HelloServlet(),"/hello"); } -
动态注册,创建一个类去实现前面提到的 ServletContextInitializer 接口,并把它注册为一个 Bean,Spring Boot 会负责调用这个接口的 onStartup 方法
启动一个tomcat 不是 Tomcat tomcat = new Tomcat();tomcat.start(); 就ok了,需要为 Tomcat 设置端口、Servlet、Filter、Listener 等数据,Servlet 类可以先通过 ServletRegistrationBean注册到 ioc中, ServletContextInitializer 从ioc 中获取ServletRegistrationBean 数据并最终 将Servlet 数据传入到ServletContext
public WebServer getWebServer(ServletContextInitializer... initializers) {
    Tomcat tomcat = new Tomcat();
    ...
    Connector connector = new Connector(this.protocol);
    connector.setThrowOnFailure(true);
    tomcat.getService().addConnector(connector);
    tomcat.setConnector(connector);
    tomcat.getHost().setAutoDeploy(false);
    configureEngine(tomcat.getEngine());
    for (Connector additionalConnector : this.additionalTomcatConnectors) {
        tomcat.getService().addConnector(additionalConnector);
    }
    prepareContext(tomcat.getHost(), initializers);
    return getTomcatWebServer(tomcat);
}
protected void prepareContext(Host host, ServletContextInitializer[] initializers) {
    TomcatEmbeddedContext context = new TomcatEmbeddedContext();
    context.setName(getContextPath());
    context.setDisplayName(getDisplayName());
    context.setPath(getContextPath());
    WebappLoader loader = new WebappLoader(context.getParentClassLoader());
    loader.setLoaderClass(TomcatEmbeddedWebappClassLoader.class.getName());
    loader.setDelegate(true);
    context.setLoader(loader);
    if (isRegisterDefaultServlet()) {
        addDefaultServlet(context);
    }
    context.addLifecycleListener(new StaticResourceConfigurer(context));
    ServletContextInitializer[] initializersToUse = mergeInitializers(initializers);
    host.addChild(context);
    configureContext(context, initializersToUse);
    postProcessContext(context);
}
@EnableAutoConfiguration 如何工作
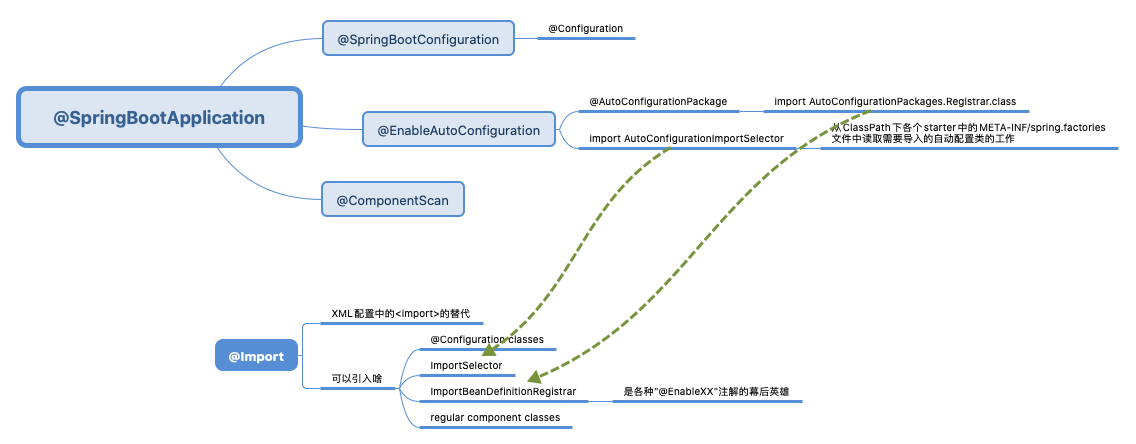
Spring Boot 是基于Spring4的条件注册的一套快速开发整合包
@Target(ElementType.TYPE)
@Retention(RetentionPolicy.RUNTIME)
@Documented
@Inherited
@SpringBootConfiguration
@EnableAutoConfiguration
@ComponentScan(excludeFilters = {
        @Filter(type = FilterType.CUSTOM, classes = TypeExcludeFilter.class),
        @Filter(type = FilterType.CUSTOM,
                classes = AutoConfigurationExcludeFilter.class) })
public @interface SpringBootApplication {
    ...
}
如果使用了@SpringBootApplication注解,那么自动就启用了EnableAutoConfiguration
@Target(ElementType.TYPE)
@Retention(RetentionPolicy.RUNTIME)
@Documented
@Inherited
@AutoConfigurationPackage
@Import(AutoConfigurationImportSelector.class)
public @interface EnableAutoConfiguration {
    String ENABLED_OVERRIDE_PROPERTY ="spring.boot.enableautoconfiguration";
    Class<?>[] exclude() default {};
    String[] excludeName() default {};
}
@Import 的作用类似xml 中的<import> Provides functionality equivalent to the <import/> element in Spring XML.Allows for importing @Configuration classes,ImportSelector and
ImportBeanDefinitionRegistrar implementations
public class AutoConfigurationImportSelector implements DeferredImportSelector{
    protected AutoConfigurationEntry getAutoConfigurationEntry(
            AutoConfigurationMetadata autoConfigurationMetadata,
            AnnotationMetadata annotationMetadata) {
        ...
        List<String> configurations = getCandidateConfigurations(annotationMetadata,
                attributes);
        ...
    }
    protected List<String> getCandidateConfigurations(AnnotationMetadata metadata,
            AnnotationAttributes attributes) {
        List<String> configurations = SpringFactoriesLoader.loadFactoryNames(
                EnableAutoConfiguration.class, getBeanClassLoader());
        return configurations;
    }
}
自动配置类就是普通的Spring @Configuration类,通过SpringFactoriesLoader机制完成加载,实现上通常使用@Conditional(比如@ConditionalOnClass或者@ConditionalOnMissingBean)
spring-boot-autoconfigure META-INF/spring.factories内容示例
org.springframework.boot.autoconfigure.EnableAutoConfiguration=\
org.springframework.boot.autoconfigure.admin.SpringApplicationAdminJmxAutoConfiguration,\
org.springframework.boot.autoconfigure.aop.AopAutoConfiguration,\
org.springframework.boot.autoconfigure.amqp.RabbitAutoConfiguration,\
...
总结一下就是,@EnableAutoConfiguration 会push springboot 加载各个依赖jar META-INF/spring.factories 中key=org.springframework.boot.autoconfigure.EnableAutoConfiguration 指定的@Configuration 类
starter 的本质是采用import 方式,在如何引用bean 做了创新,最终实现:只要配置了META-INF/spring.factories的jar 在classpath 下即可进入spring ioc的效果。
其它
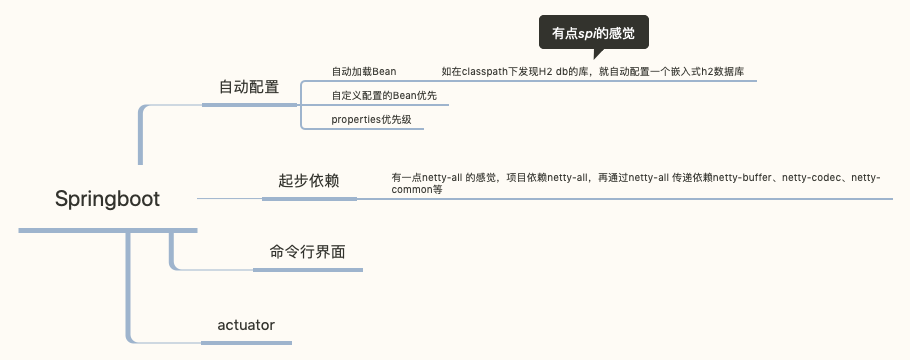
Spring 和 SpringBoot 之间到底有啥区别?SpringBoot基本上是 Spring框架的扩展
- 创建独立的 Spring应用。
- 嵌入式 Tomcat、 Jetty、 Undertow容器(无需部署war文件)。
- 提供的 starters 简化构建配置
- 尽可能自动配置 spring应用。
- 提供生产指标,例如指标、健壮检查和外部化配置
- 完全没有代码生成和 XML配置要求
你写的代码是别人的噩梦吗?从领域建模的必要性谈起通过Annotation注解的方式对领域能力和扩展点进行标注,然后在系统bootstrap阶段,通过代码扫描的方式,将这些能力点和扩展点收集起来上传到中心服务器。类似的,starter 就有这么点意思。
